
Create and edit States
Create an asset from your model root with Create Model Vista Asset, or load a GLB/glTF. Choose Asset Root to switch between authored assets. States are stored on that root and saved with the blend; edits support undo/redo.
Add States and options
Section titled “Add States and options”- Select a compatible target inside Asset Root.
- In States, choose Add State, select a type, and name it.
- Set up the scene, then choose Add Option in the State card.
- Click an option name to preview. Expand Edit and choose Set as Startup to save the initial choice explicitly.
- Edit the State name in its card header. State Settings contains UI visibility, startup/default and apply-on-awake settings, autoplay, random playback, interval, and the State thumbnail.
Option Edit exposes name, duration/rate, easing, thumbnail controls, Edit Option Settings, and duplicate/delete/reorder controls. State management is under Advanced / Organize. Deletion asks for confirmation. Reordering updates Group references and defaults; deleting a referenced State or option is blocked until its links are removed.
Capture or edit a pose
Section titled “Capture or edit a pose”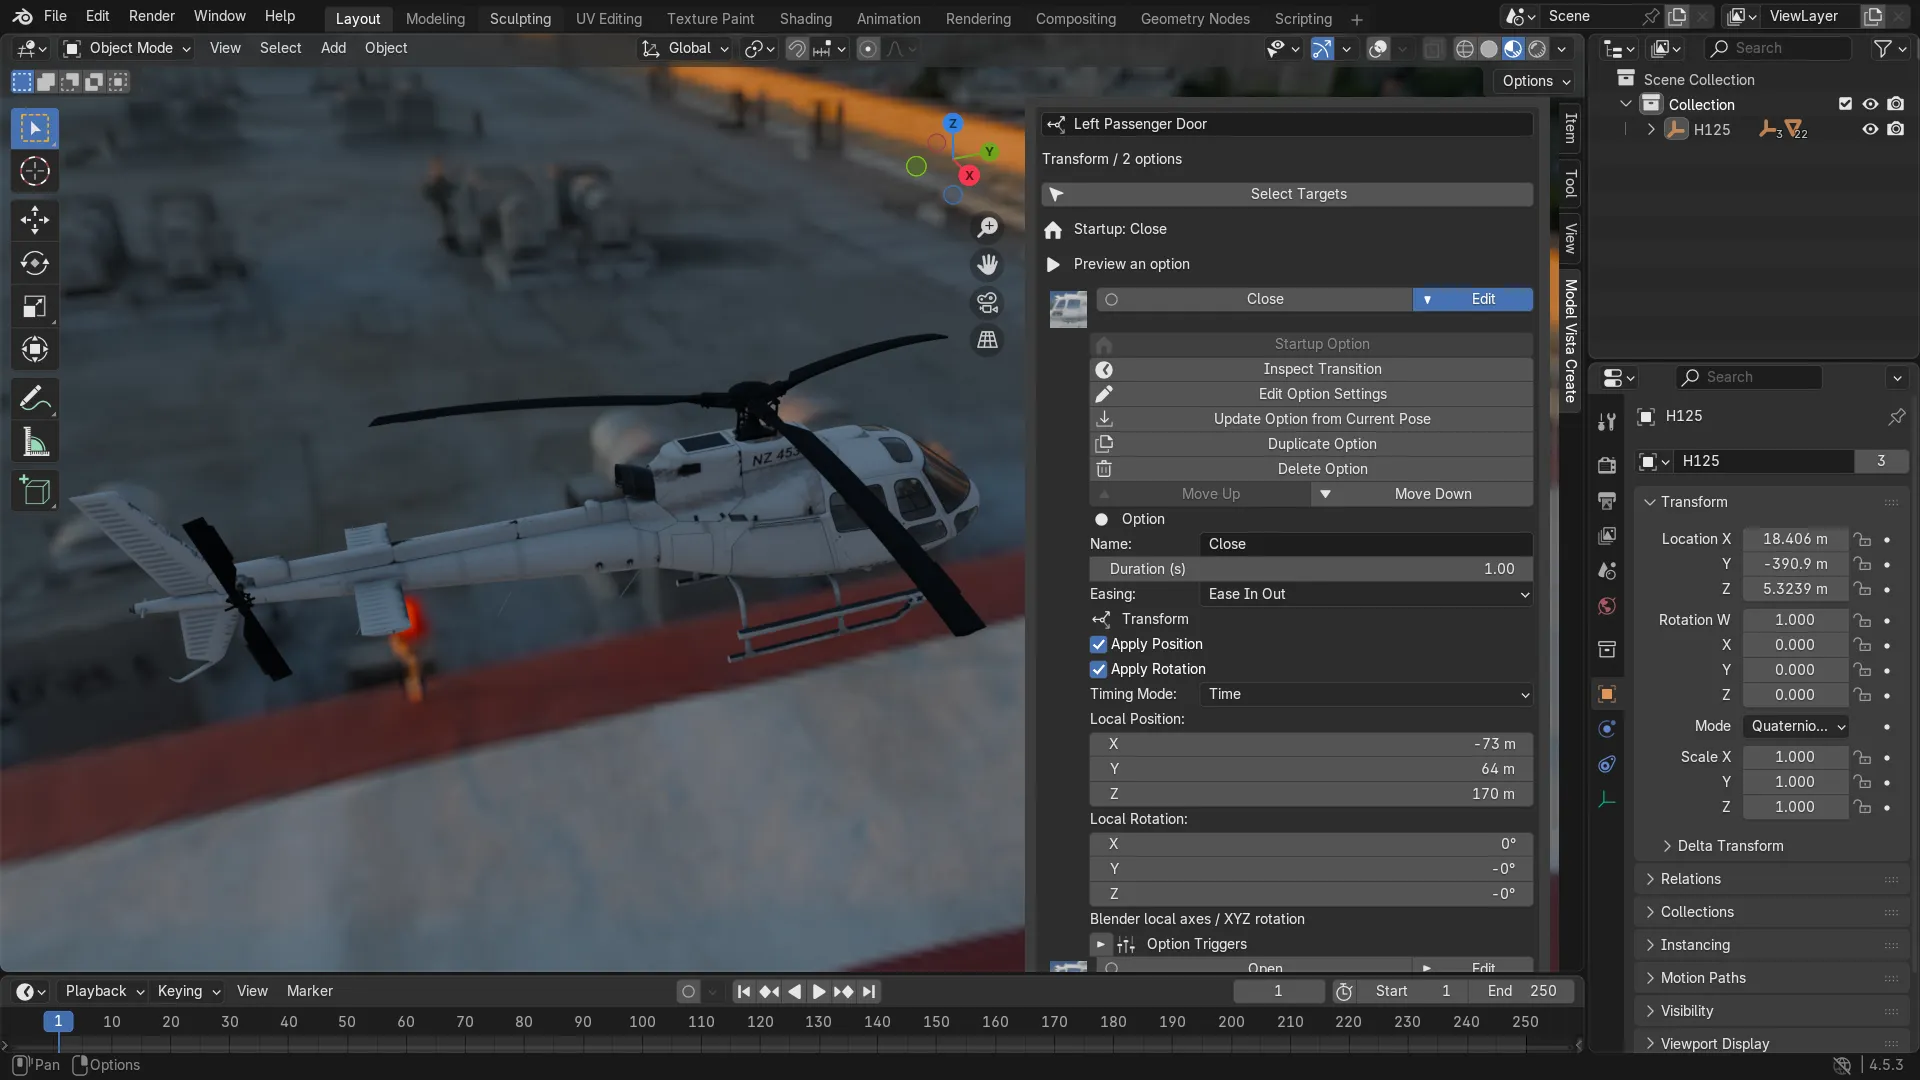
For Transform and Camera, Add Option captures the current pose. To replace it, expand Edit > Update Option from Current Pose. Review the destination option, resolved source object, and overwritten properties before confirming.
Transform capture stores local position and rotation and enables their apply flags. Inline controls include Apply Position, Apply Rotation, Timing Mode, Local Position, and Local Rotation. Position uses Blender local axes and scene units; rotation uses XYZ Euler angles and is serialized as a normalized quaternion. Disabling an apply flag preserves its stored values.
Camera capture stores local position, rotation, field of view, projection, and orthographic size, enabling the related apply flags. Use Edit Option Settings for additional type-specific settings. Editing values changes the saved option; click its name to preview the result.
Assign object targets
Section titled “Assign object targets”Targets applies to every option in Transform, Camera, Animation, Material, and Light States. Single-object fields offer Choose Object, Select, and Use Selected Object. Choose Object opens a searchable picker. Mesh and Light lists offer Add Selected, Replace with Selected, and individual choose/select/remove controls. Add preserves existing entries and ignores duplicates; Replace replaces the list.
Activation targets are per option under Edit > Visible Objects. Adding an Activation option records selected children; no selection creates an empty, hidden option.
Bindings follow renames and reparenting within the asset root. Deleted targets or targets moved outside it must be reassigned before export. Exact paths distinguish objects such as Fuselage and Fuselage.001 in 1.0.0. If an older version saved the wrong target, remove that entry and add the intended object again. Target edits stop previews.
Author material alternatives
Section titled “Author material alternatives”Select meshes inside the root, with a material on the active mesh, and add a Material State. In an option’s Edit controls, choose a Blender material (including unused alternatives), Use Active Material, or Make Unique Copy. A unique copy has its own material and node tree; image textures remain shared.
Use Select Meshes to select the targets, then edit the shader in Material Properties or the Shader Editor. The usage count identifies options sharing the material. Editing a shared material affects those options.
Material States affect the first material slot on each target mesh. Preview All Material Slots is a Blender preview override. Inline hints flag procedural textures, node groups, missing images, and missing Principled surfaces. Bake procedural effects to glTF-compatible image textures; hints do not guarantee matching appearance.
Link States in a Group
Section titled “Link States in a Group”Add a Group State and expand an option’s Edit > Linked States. Use Add Linked State, Change Linked Option, and Remove Link to assemble its choices. Adding the same State replaces its choice. Missing references, invalid option indices, and cycles block export.
In State Settings > Group Timing, choose Group Duration to drive links with the Group option’s duration/easing, or Linked State Durations to use each linked option’s settings.
Capture Light settings
Section titled “Capture Light settings”Select a normalized Sun, Point, or Spot light and add a Light State. Adjust the light, then add an option or use Capture Light Settings. Review the source and overwritten settings in the confirmation dialog. Edit Option Settings exposes EV100, color filter, and temperature.
Blender 5.1 previews temperature; 4.5 preserves it for export while previewing energy and filter. Area lights and custom light-node shading are outside capture support.
Bake Animation options
Section titled “Bake Animation options”- Select a mesh/Empty subtree and set the scene frame range before adding an Animation State.
- Set up the source Actions, NLA, and constraints.
- Add an option, then choose Bake Timeline into Option to capture the evaluated timeline at the scene frame rate. Confirm the subtree and frame range.
- Repeat for alternative animation setups. Each bake appends an independent clip, preserving other options.
- In Edit Option Settings, set clip index, speed, loop, and crossfade. Index
-1stops playback.
Restore previews before editing source animation. Rebake after source changes. Baking supports object position, quaternion rotation, and scale, with a limit of 10,001 frames; animated objects must stay in the target subtree. Skeletal, shape-key, camera/light, and shader animation authoring are excluded.
Save the blend to retain the project, or save/export the delivery file.
