
Editor Import And Export
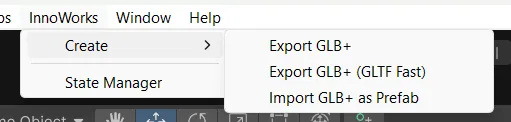
Model Vista Create adds these Unity Editor commands under InnoWorks > Create:
- Export GLB+ via glTFast (Draco compression) - the default export and the action used by the Scene View overlay.
- Export GLB+ via glTFast - exports uncompressed mesh data.
- Export GLB+ via Unity GLTF - optional and enabled when
org.khronos.unitygltfis installed. - Import GLB+ as Prefab - imports one or more selected or externally chosen GLB files.
- Import GLB+ Folder as Prefabs - imports the top-level
.glbfiles in a selected folder. - Install UnityGLTF Package… - starts installation of the optional UnityGLTF exporter.
Export A Model Vista GLB
Section titled “Export A Model Vista GLB”- Select one or more prefab assets or scene GameObjects.
- Choose InnoWorks > Create > Export GLB+ via glTFast (Draco compression), or use Export GLB+ in the Scene View overlay.
- For one selection, choose a
.glbdestination. For multiple selections, choose a destination folder; Unity writes one GLB per selected root. - Review the Unity Console for the export result and any compatibility warnings.
The default glTFast export uses Draco mesh compression with 20-bit position and texture-coordinate quantization. Use Export GLB+ via glTFast when uncompressed mesh data is required. UnityGLTF uses the same Model Vista extension payload format, but its mesh compression behavior is backend-specific.
Export writes a binary .glb and injects the INNOWORKS_configurables root extension. The extension can include States containers, Input Actions, autoplay data, metadata, thumbnails, lights, reflection probes, legacy animation data, material property records, material bindings, inactive GameObject records, and embedded texture payloads.
Import A Model Vista GLB As A Prefab
Section titled “Import A Model Vista GLB As A Prefab”- Optionally select one or more
.glbassets in the Project window. - Choose InnoWorks > Create > Import GLB+ as Prefab.
- If no Project assets were selected, choose an external
.glbfile. - Choose a prefab destination under
Assets/, or a destination folder for multiple files. - At GLB+ Texture Import, choose:
- Extract Images to persist compatible embedded PNG and JPEG 2D textures as image files.
- Keep Unity Assets to keep imported textures as native
.assetfiles. - Cancel to stop the import.
- Let the importer create the prefab and supporting assets.
Use Import GLB+ Folder as Prefabs for batch import. It reads the top-level .glb files in the selected source folder and requires the destination folder to be inside Assets.
Import restores Model Vista States components, metadata, material assets, thumbnails, lights, reflection probes, animations, material bindings, and compatible exported shader properties and texture payloads. Supporting assets are generated below the import destination in Materials, Textures, Thumbnails, and Animations folders as required.
Raw HDR or floating-point textures, texture arrays, WebP/KTX2 resources, ambiguous images, and unsupported texture types remain native Unity assets even when Extract Images is selected. This is an Editor persistence choice and does not change runtime GLB loading.
Texture Compatibility
Section titled “Texture Compatibility”Model Vista preserves high-precision textures and texture arrays, including R16 textures, during GLB export and import.
